Copying reports from the LMS into ChatGPT, asking for an analysis, and pasting the response back works — until the day you need to do it for 12 classes. The Model Context Protocol (MCP) solves the problem at the root: ChatGPT talks directly to the LMS, with your account and your permissions, and you just ask.
This tutorial shows, with screenshots, how to connect ChatGPT to Studeia using a custom MCP plugin. The screenshots show Studeia in Portuguese and ChatGPT in the language and theme of the account used (Portuguese, dark theme); menu names may vary slightly depending on your ChatGPT version and language.
Quick Answer
- The LMS needs a remote MCP server with OAuth — Studeia has one per institution
- In Studeia: Settings → AI Connectors → turn on → copy the URL
- In ChatGPT: Settings → Plugins → Developer Mode → turn on; then + (New plugin) → Server URL → OAuth → Create
- Login + consent in Studeia → account appears under Connected accounts
- In chat: + → MCP Studeia. Write actions require confirmation; everything is in the audit log; revoke whenever you want
Prerequisites
| What | Detail |
|---|---|
| ChatGPT account with Developer Mode | OpenAI's custom MCP plugin feature — availability depends on your account plan |
| Role in Studeia | Institutional admin, coordinator, pedagogical staff, or teacher (if the institution allows teachers) |
| Connector enabled | An institutional admin needs to activate the connector once |
| Institution address | https://<slug>.studeia.com or the verified custom domain (the main address https://studeia.com/api/mcp also works) |
Step 1 — Enable the Connector in Studeia (admin)
As an institutional admin, open Settings → AI Connectors (ChatGPT / Claude) and turn on Allow MCP connections. If you want teachers to connect as well (restricted to the courses and classes they teach), leave Teachers can also connect turned on.
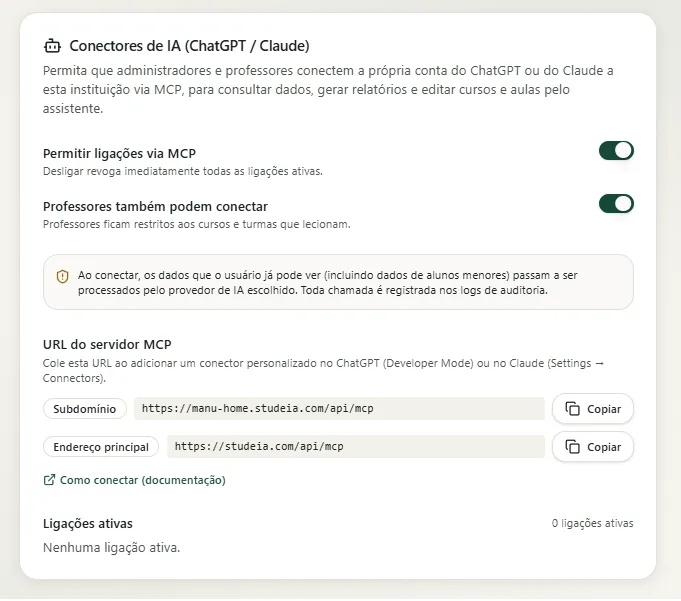
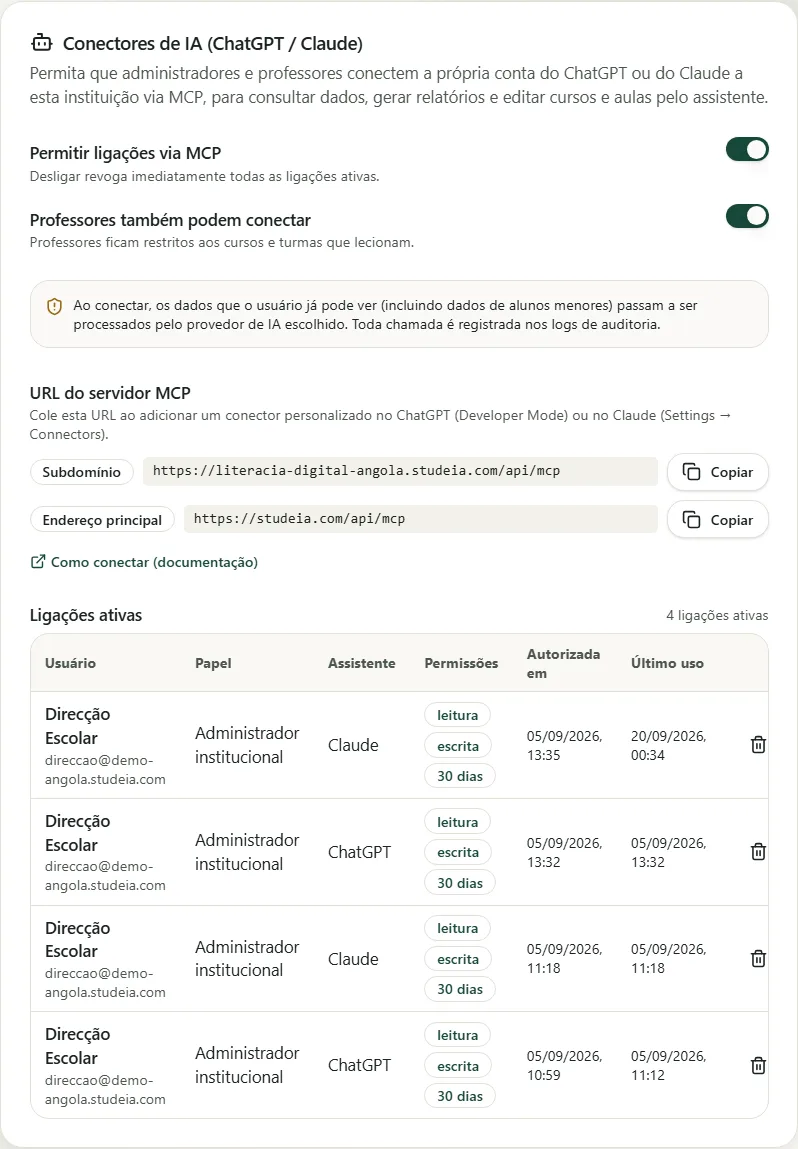
Copy the MCP server URL. The Subdomain option (https://<slug>.studeia.com/api/mcp) is the most common; if the institution uses a verified custom domain, it appears first; the Main address (https://studeia.com/api/mcp) works for any institution, because Studeia identifies your institution from the account you log in with.
The Active connections list just below shows who has connected, with which assistant, which permissions, and when they last used it — this is where an admin revokes an individual connection.
Step 2 — Enable Developer Mode in ChatGPT
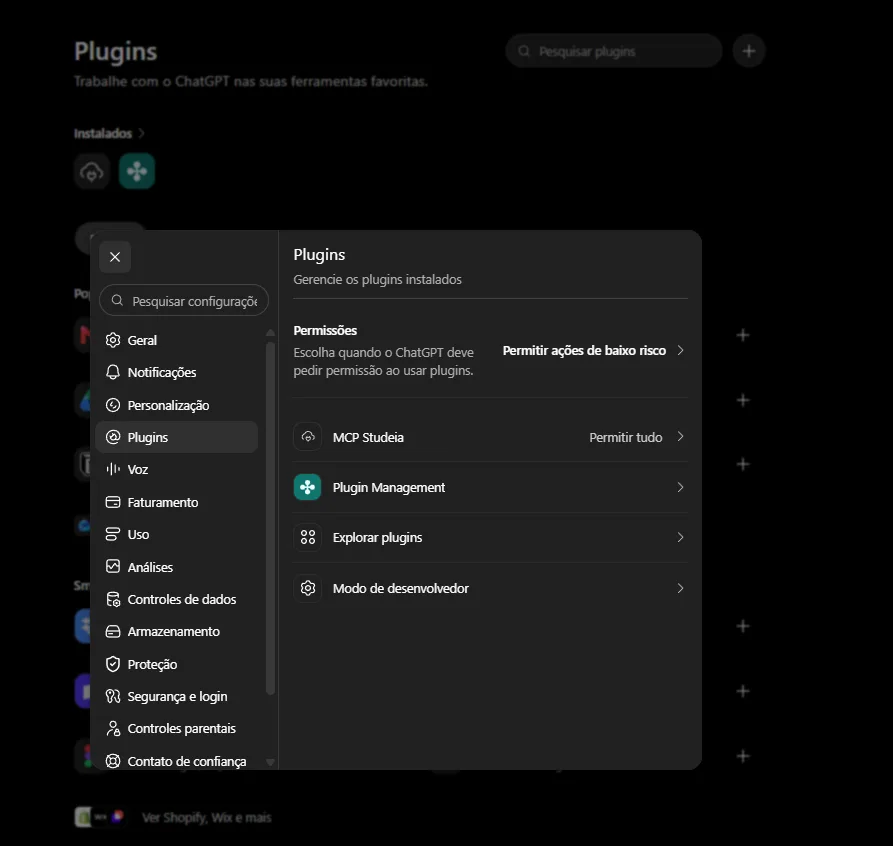
In ChatGPT, open Settings → Plugins. This is the panel where ChatGPT gathers installed plugins, the gallery (Explore plugins), and the permissions settings.
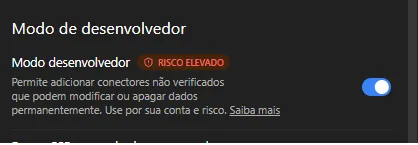
Go to Developer Mode and turn on Developer mode. ChatGPT marks this option as High risk: from this point it accepts servers that OpenAI has not verified. The warning is generic and expected — in Studeia's case, the plugin only does what your account can do, and every write action requires your confirmation.
Step 3 — Create the Plugin
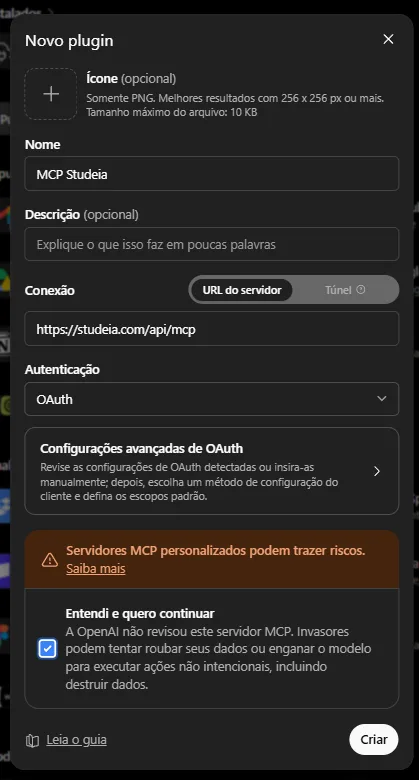
Go back to Plugins and click the + button (in the top corner, next to the search bar). The New plugin form opens:
| Field | Value |
|---|---|
| Icon | optional (PNG up to 10 KB) |
| Name | MCP Studeia (or your institution's name) |
| Description | optional — e.g., "Courses, classes, and reports for School X" |
| Connection | Server URL (do not use Tunnel) |
| URL | the URL copied in step 1 |
| Authentication | OAuth |
| Advanced OAuth settings | leave as is — ChatGPT detects everything automatically |
You do not need to enter a Client ID or Client Secret: Studeia uses dynamic client registration, so ChatGPT registers itself at the time of connection. Read the notice "Custom MCP servers may pose risks," check I understand and want to continue, and click Create.
Step 4 — Authorize with Your Studeia Account
After clicking Create, ChatGPT opens Studeia. If you are not logged in, sign in as usual (including via SSO, if your institution uses it). The consent screen then appears:
- who is requesting access (ChatGPT) and to which institution;
- Requested permissions: read what you already see, create and edit as on the web, maintain the connection for up to 30 days;
- a note about your role (teacher sees only their courses; admin sees everything);
- the privacy notice: data queried will be processed by OpenAI.
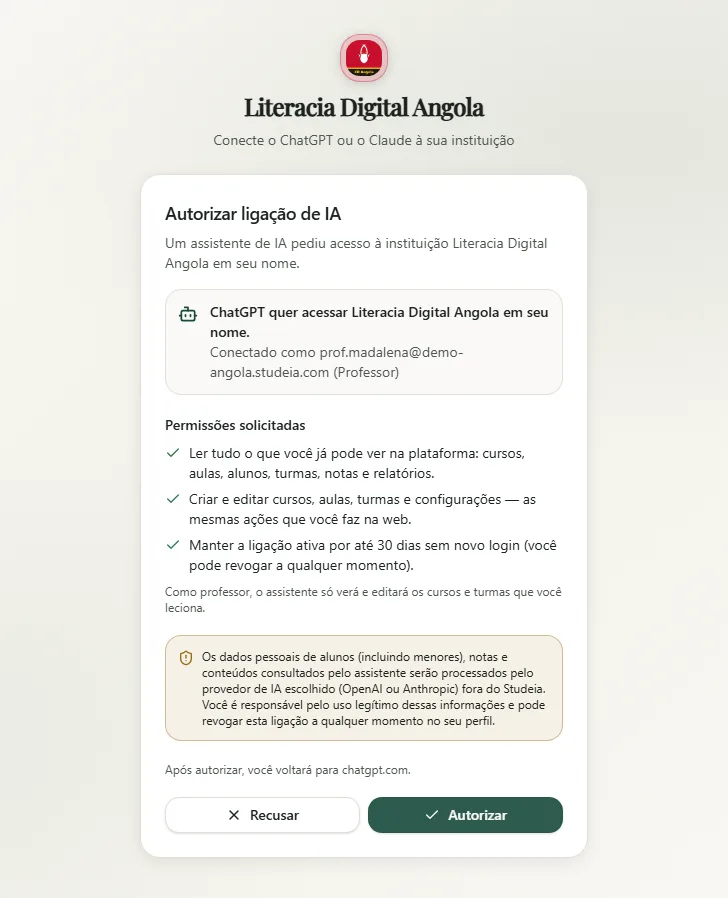
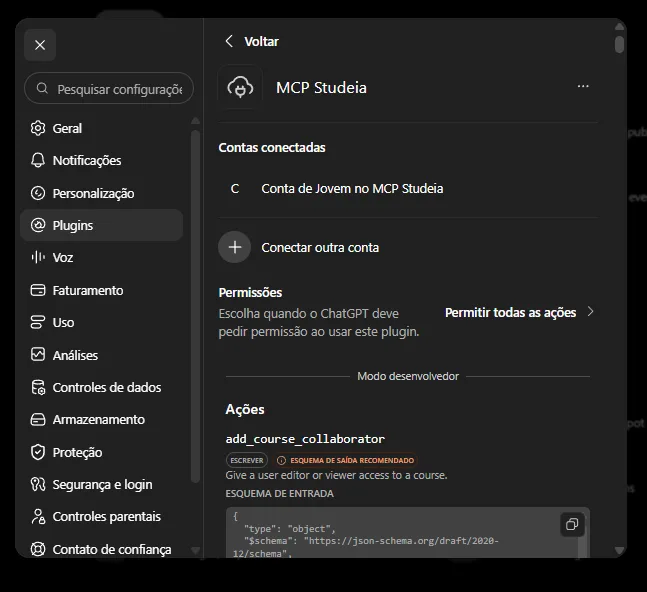
Click Authorize. Back in ChatGPT, the plugin page shows your account under Connected accounts (you can Connect another account — for example, one for another institution), the Permissions block, and, because you are in Developer Mode, the Actions list: each Studeia tool with its description, the Write badge on those that modify data, and the JSON input schema. This is a great way to see, before using it, exactly what the plugin can do with your role.
Step 5 — Use It in Chat
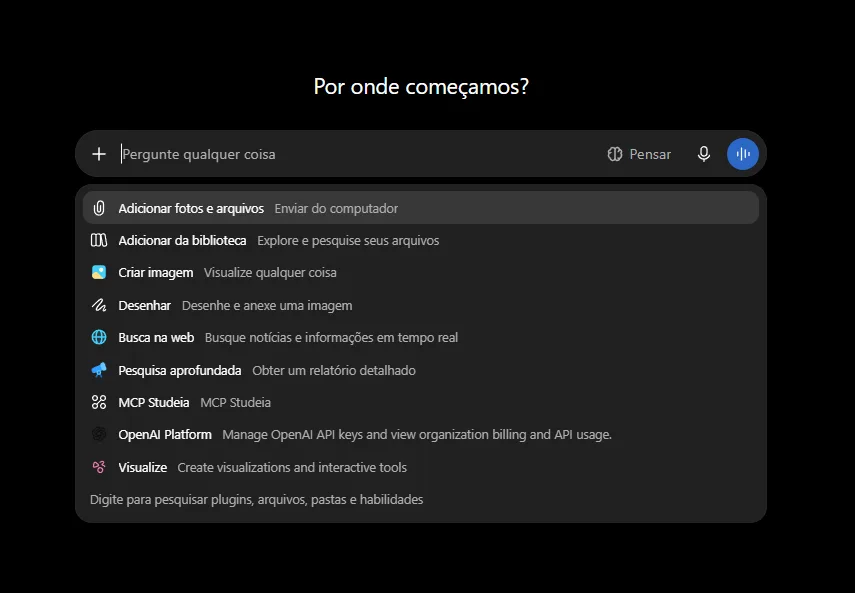
In a new chat, click the + button in the message box: MCP Studeia appears in the list, alongside Web search and Deep research. Select it (or simply ask something about your institution — with the plugin installed, ChatGPT will usually activate it automatically).
A good first request: "Show the institution overview." ChatGPT calls get_tenant_overview and summarizes courses, classes, and users. During the response it shows a collapsible block with the plugin and action names (e.g., MCP Studeia · list_courses); clicking it shows the data that was sent and what came back — nothing happens "behind the scenes."
Write Actions Require Confirmation
Each plugin has a Permissions setting (on the plugin page or under Settings → Plugins → Permissions). The default is Allow low-risk actions: read actions run directly; for actions marked as Write (create lesson, post grade, enroll, publish), ChatGPT pauses the response, shows the action name and the data it intends to send, and only continues when you confirm. This is your chance to review what will change. The Allow all actions option removes that pause — use it for repetitive tasks where you have already reviewed the request, and switch back to the default afterward.
What to Ask ChatGPT (by Role)
Teacher
- "Which students in my class B are at risk and why?"
- "Create a teacher's guide for lesson 3 of the Fractions course with a 45-minute script."
- "Generate an 8-question quiz on module 2 and publish it as lesson 7."
- "Post a grade of 8.5 for Ana on the Exam 1 assessment and show the class average."
Coordinator or Pedagogical Staff
- "Compare the performance of the three 6th-grade classes by competency."
- "List courses with no published lessons and the teachers responsible for them."
- "Which students have never accessed the platform? Export as a table."
Admin
- "Create an automation that notifies the coordinator when a student goes 7 days without access."
- "How much did we spend on AI this month, broken down by course?"
- "Show the latest audit events for the MCP connector."
A typical report comes back as text with a table (student, risk, reason, last activity) and suggested interventions. Since the data comes from Studeia's reporting tools (get_student_report, get_course_report), the numbers are the same ones you would see in the dashboard — ChatGPT just organizes and comments on them.
Deep Research
The plugin implements the search and fetch tools in ChatGPT's contract, so it can also be used as a source in Deep research: enable the plugin alongside the research feature and ChatGPT will search courses, lessons, and users at the institution and cite what it finds, mixing in web sources if you ask.
Security, Privacy, and Audit
- Acts as you: the OAuth token represents your account; your role and institution are re-read on every call. If your role changes, the connection is revoked.
- Short, rotating tokens: 1-hour access, automatic renewal, connection lasts at most 30 days.
- Audit log: every call generates an
mcp.tool_callevent in the institution's logs (tool, IDs, success, duration — never the content). Filter bymcp.under Logs. - Data: what ChatGPT queries is processed by OpenAI, outside of Studeia. The institution is the data controller — request only what is necessary and revoke idle connections.
- Out of scope: file uploads, billing, SSO/SCIM, provider keys, and the connector configuration itself are never accessible via MCP.
Common Issues
| Symptom | What to do |
|---|---|
| The + / New plugin button does not appear | Turn on Developer Mode under Settings → Plugins → Developer Mode |
| "The institution has not yet enabled AI connectors" | Ask your admin to enable the connector under Settings → AI Connectors |
| "The institution does not allow teachers to connect" | The admin needs to turn on Teachers can also connect |
| Authorization request expired | You took more than 10 minutes on the consent screen — create the plugin again |
| Tool responds with forbidden | You do not teach that course, or the action is admin-only |
| ChatGPT does not ask for confirmation on a write action | The plugin permission is set to Allow all actions — switch back to Allow low-risk actions |
| Asks for login again after weeks | The connection reached 30 days — authorize again |
Revoking
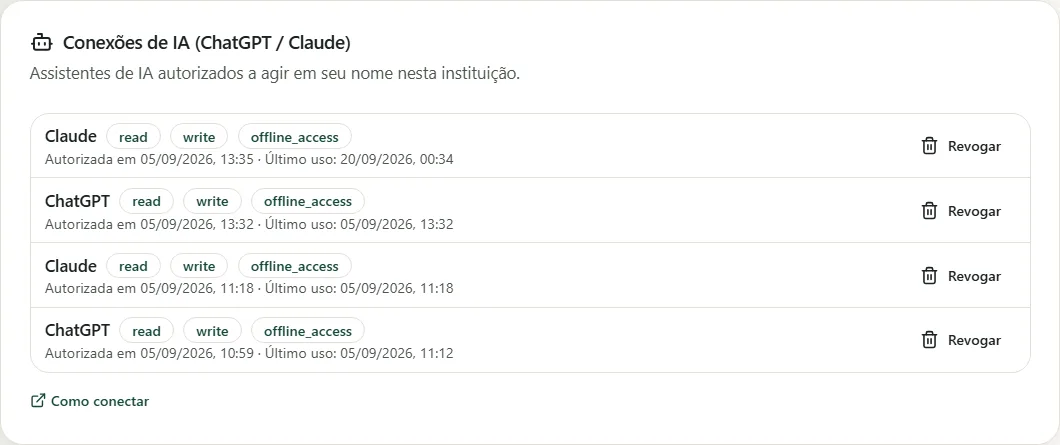
- You: Profile → AI Connections (ChatGPT / Claude) → Revoke.
- Admin: Settings → AI Connectors → Active connections → Revoke; turning the connector off revokes all connections.
- In ChatGPT, remove the plugin under Settings → Plugins (the ⋯ menu on the plugin page) to stop it from appearing in chat.
Frequently Asked Questions
Do I need Developer Mode? Yes — that is what unlocks custom MCP plugins in ChatGPT.
Does ChatGPT see all students? Only what your account sees: teachers are restricted to their own classes.
Can it delete things on its own? Not with the default permission: every write action requires confirmation and is audited.
Is there an extra cost? Not in Studeia — included in all plans, with a call limit per hour.
Complete connector guide (permissions by role, catalog of all 130 tools, security): Connect ChatGPT, Claude, or Claude Code to Studeia. Prefer Claude? See Connect Claude to Your LMS and Claude Code + LMS.